


Proper deck staining requires meticulous preparation: clear debris, inspect & repair surfaces, pressure wash to remove stains, mold & mildew. Gather tools like a pressure washer, brush, detergent, protective gear and a ladder for high areas. Avoid common mistakes: inadequate surface prep, incorrect stain mixture or outdated products lead to streaked, uneven finishes. Always follow manufacturer instructions and ensure thorough deck preparation for professional, long-lasting results.
Before transforming your deck with stunning stains, proper preparation is key. This guide explores the critical step of cleaning surfaces for optimal results in deck staining. We’ll walk you through a detailed, step-by-step process to ensure a smooth, clean canvas. From essential tools and materials to common mistakes to avoid, discover expert tips for achieving a vibrant, long-lasting stain. Achieve professional-grade deck staining with these insightful instructions.
- Prepare Surfaces for Staining: A Step-by-Step Guide
- Essential Tools and Materials for Effective Cleaning
- Common Mistakes to Avoid Before Deck Staining
Prepare Surfaces for Staining: A Step-by-Step Guide

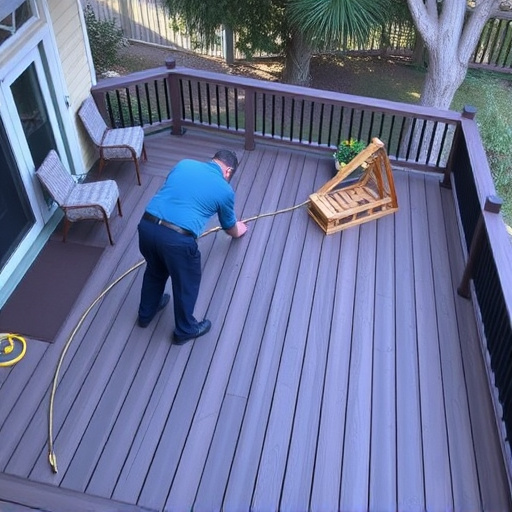
Before applying any deck staining, it’s crucial to prepare your surfaces properly for the best results and longevity of the finish. Start by sweeping or brushing away any loose debris, dirt, or gravel from the deck area. This initial step ensures a clean canvas for your new stain. Next, inspect the surface for any siding repairs or roofing services that might be needed. Patching or replacing damaged boards or fixing leaks in the roof or siding will prevent issues down the line and ensure an even application of the stain.
After addressing any necessary repairs, pressure wash the deck to remove stains, mold, mildew, and other buildup. This powerful cleaning method prepares the surface by eliminating impurities that could affect adhesion. For commercial roofing or areas with complex shapes, consider using a low-pressure setting to avoid damaging the material. Once the deck is thoroughly washed and dried, it’s ready for staining, ensuring a vibrant, long-lasting finish.
Essential Tools and Materials for Effective Cleaning

To ensure a professional and long-lasting deck staining project, gathering the right tools and materials is essential. Start with a pressure washer, which effectively removes dirt, stains, and grime from your deck’s surface. Pair this with a stiff-bristled brush to tackle tough spots and hard-to-reach areas. For cleaning solutions, opt for a mild detergent or a specialized deck cleaner designed to remove oil, grease, and other residues commonly found on exterior surfaces.
Don’t underestimate the importance of protective gear, including gloves, safety goggles, and a respirator mask, as these safeguard you during the cleaning process. Additionally, consider a ladder or platform for reaching higher levels of your deck. With these essential tools and materials at hand, you’ll be well-prepared to prepare your deck for staining, making way for beautiful exterior home improvements, much like transforming a weathered surface into a vibrant masterpiece after storm damage repair or roof replacement.
Common Mistakes to Avoid Before Deck Staining

Before diving into the process of deck staining, it’s crucial to be aware of common mistakes that can lead to an inferior finish and potential damage. One of the biggest blunders is neglecting to properly prepare the surface. Decks that have not been cleaned thoroughly may prevent the stain from adhering correctly, resulting in a streaked or uneven application. Always start by sweeping away debris, then use a pressure washer or brush to remove any dirt, mold, or mildew.
Another frequent error is failing to patch and repair damaged sections of the deck. Cracks, holes, or loose boards should be addressed before staining. Ignoring these issues can lead to an unsightly finish that does not cover evenly. Additionally, mixing improper stain concentrations or using outdated products can cause problems. Always follow manufacturer instructions and ensure you have fresh supplies, including brushes and rollers suitable for the task. Remember, proper preparation is key to achieving a professional-looking deck staining job, ensuring longevity and a beautiful finish—a far cry from an incomplete or damaged deck surface.
Before tackling any deck staining project, proper surface preparation is key. By carefully following the steps outlined in this guide, using the right tools and materials, and avoiding common mistakes, you’ll ensure a smooth and successful staining process. With these tips in mind, you’re well-equipped to transform your deck into a vibrant, lasting color that complements your outdoor space. Remember, a clean surface is the foundation for any great stain job!